
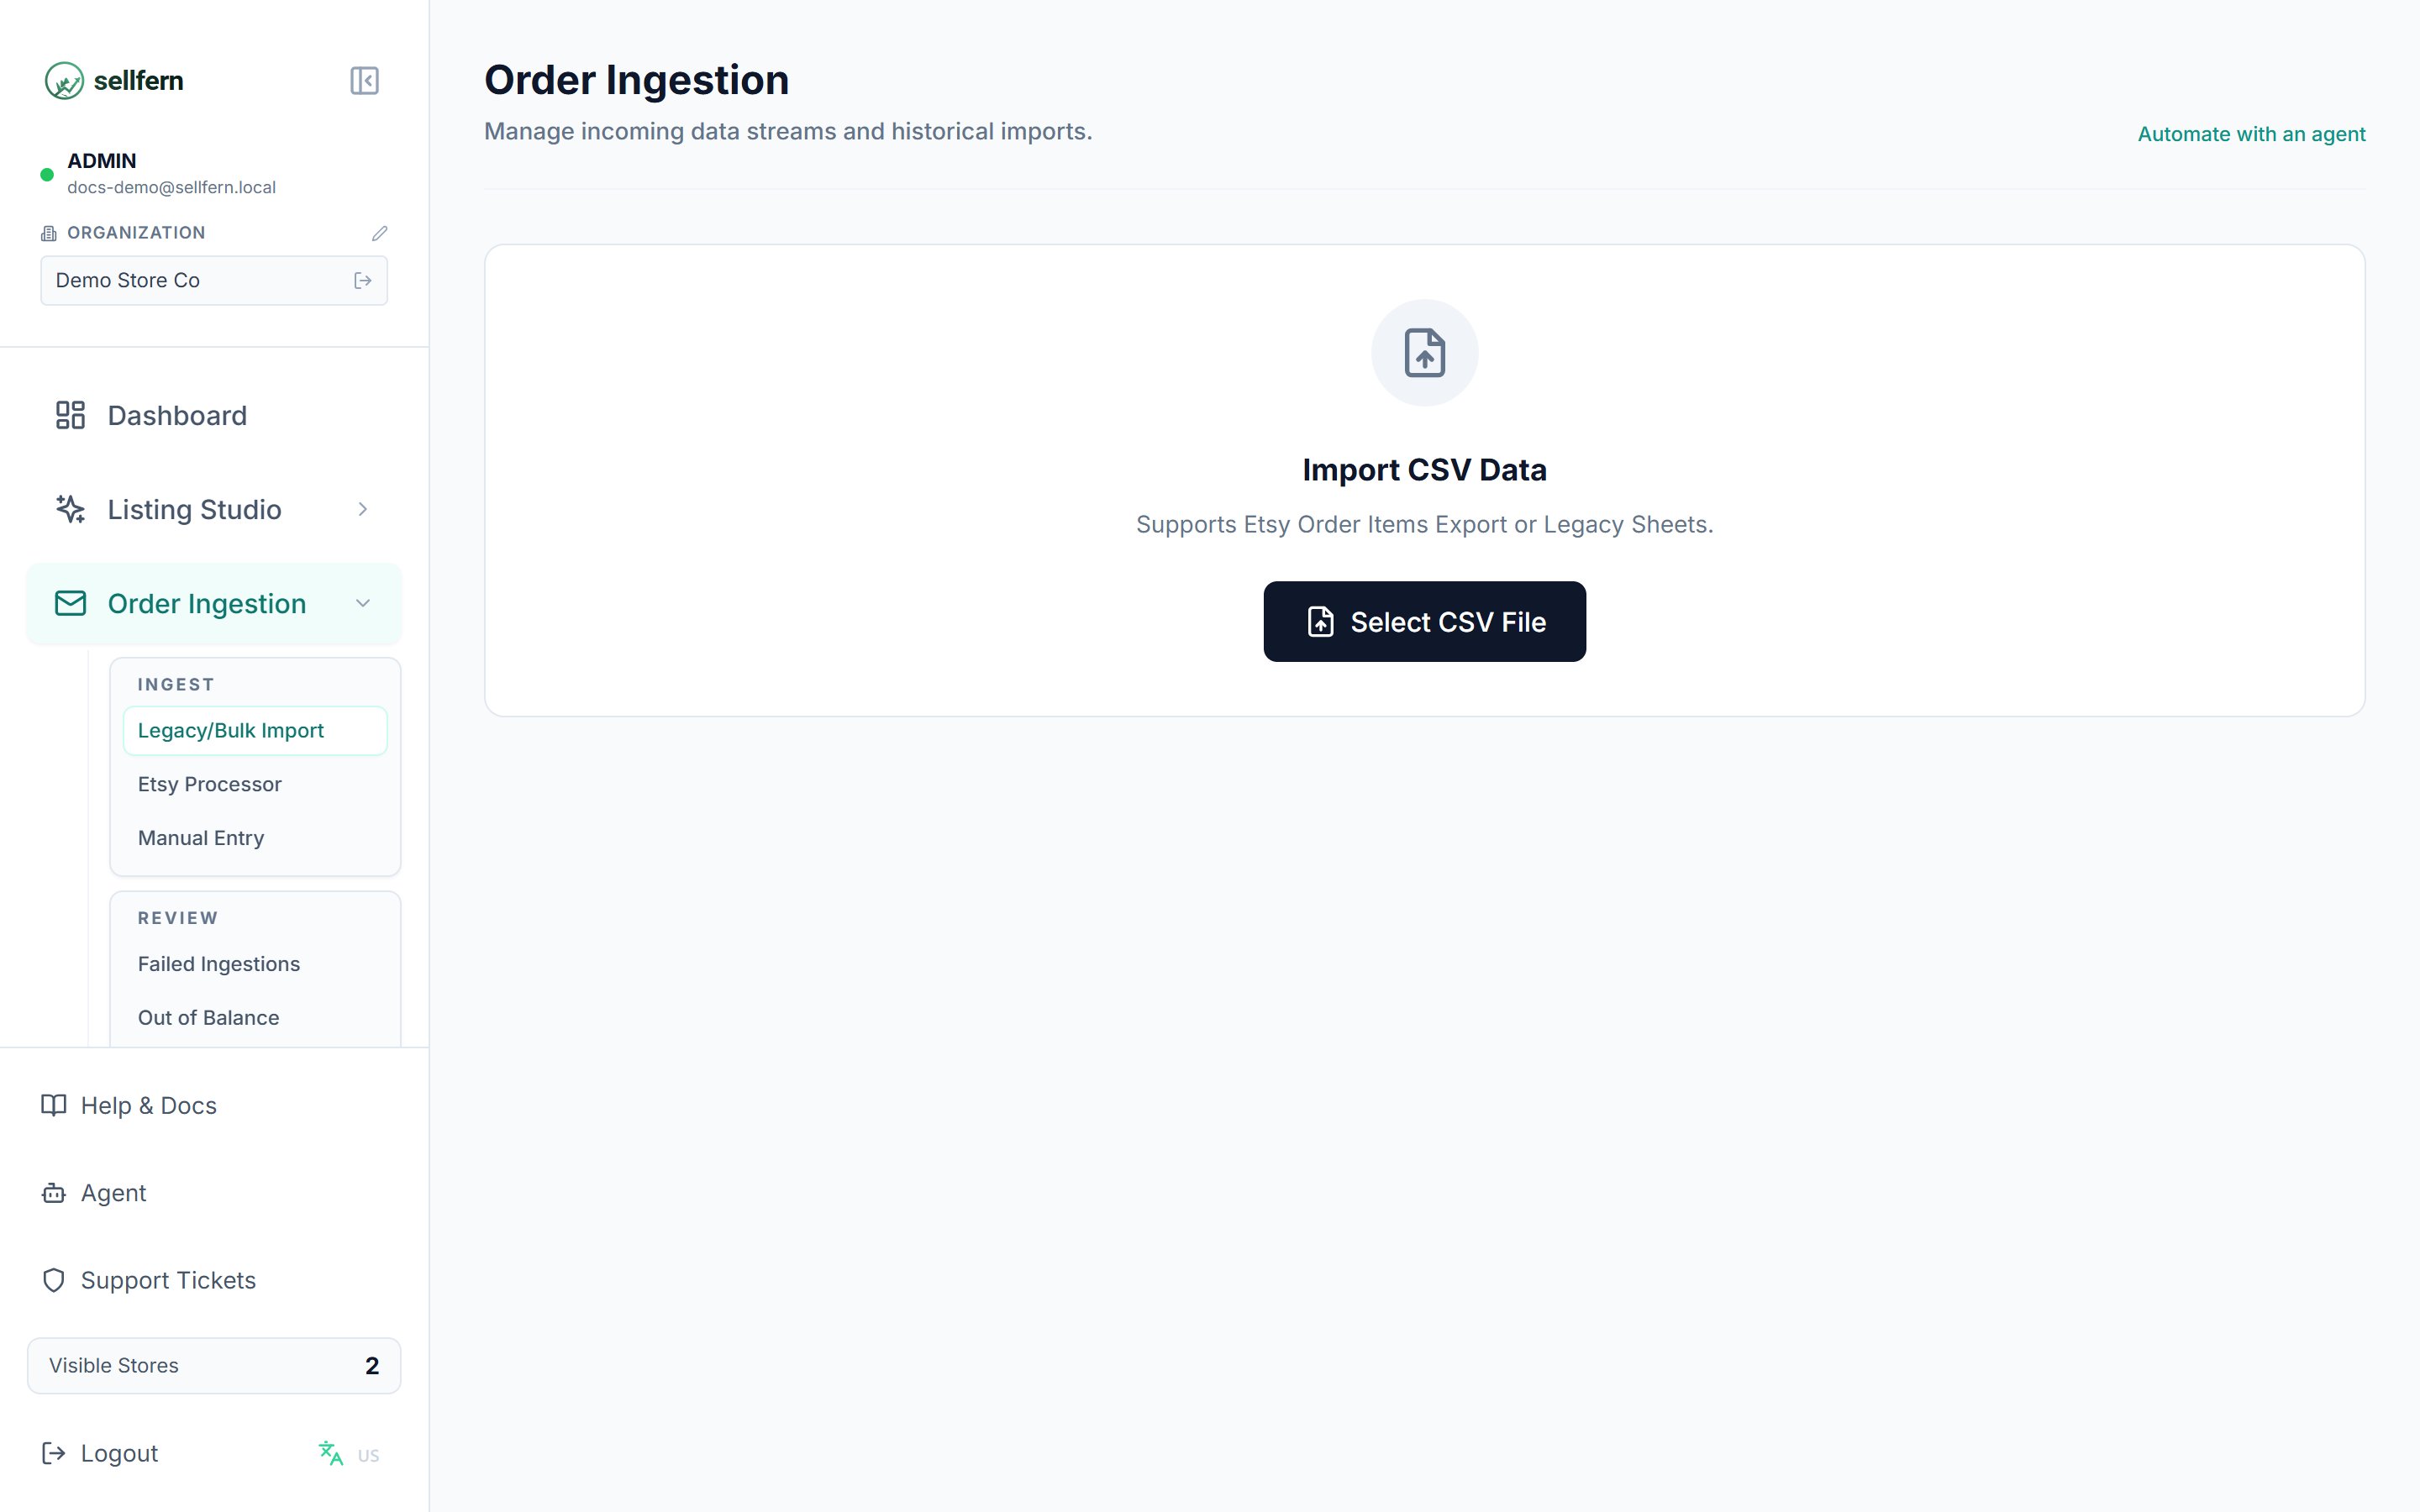
The Order Ingestion page with the three sidebar groups (Ingest / Review / History)
Direct Etsy OpenAPI v3 Sync
Connect your Etsy shop directly via OAuth 2.0 PKCE for automated real-time order receipt ingestion (
GET /receipts) and instant carrier tracking push-back (POST /tracking).Gmail Live Sync
Connect a Google account and let Sellfern scan your inbox for Etsy order confirmation emails on a schedule you control. Requires setup by your admin — see below.
Browser Extension (Etsy & Shopify)
Install a Chrome/Edge extension to fetch orders directly from Etsy or Shopify in your browser session — with optional scheduled auto-sync — and push them to Sellfern.
Webhook & API Sync
Use API tokens or Webhook endpoints to forward order events into Sellfern automatically, filed under the store you choose.
Shopify Order Sync
Install the Sellfern OrderSync app from the Shopify App Store to sync orders from a Shopify store automatically — no custom integration needed.
CSV Bulk Import
Upload historical or external orders from a spreadsheet. Sellfern previews the data before committing anything.
Manual Entry
Create or edit a single order directly for custom orders, corrections, and failed-ingestion cleanup.
Etsy Invoice Processor
Upload Etsy invoice PDFs to convert them into production sheets, with automatic address fixes, SKU repairs, and data enrichment.
Browser Extension (Etsy & Shopify)
For sellers who want to sync orders directly without setting up Gmail Live Sync or a custom API integration, Sellfern provides a Chrome/Edge browser extension. It reads orders directly from Etsy’s Mission Control API or from the Shopify Orders page in your browser session, and pushes them to Sellfern — either platform, with optional scheduled auto-sync.Setup and Configuration
1
Install the Extension
Install the extension from the official web stores:
- Chrome: Chrome Web Store
- Edge: Edge Add-ons
2
Add your Sellfern API token
Click the extension icon, open Settings, paste a Sellfern API token (create one under Settings → API Tokens), then click Test Connection. Save unlocks once the connection succeeds — the token is already tied to your organization, so there’s no separate login or org selection in the extension.
3
Choose a platform
In the popup, switch between the Etsy and Shopify tabs. Each platform keeps its own store mapping, order-state filter, and auto-sync schedule, so you can use both at the same time.
Syncing Etsy orders
- Open your Etsy Shop Manager tab in the same browser.
- Open the extension popup, stay on the Etsy tab, and click Auto Detect — it reads your Etsy Shop ID and Store Name directly from the page.
The detected Store Name must match one of the stores already created in Sellfern (Settings → Stores). If it doesn’t, the popup shows a warning and blocks Fetch Orders until the store is added.
- Select the Order State (New or Completed) — Completed also lets you pick a Completed Date window (last 30/90/365 days, or all).
- Click Fetch Orders to load a preview table, then Push to Sellfern to ingest them.
Syncing Shopify orders
- Open
admin.shopify.com/store/<handle>/ordersin the same browser and let the page finish loading orders. - Open the extension popup, switch to the Shopify tab, and click Auto Detect — it reads the store handle from the URL.
The detected handle is just a technical identifier, not necessarily your store’s display name in Sellfern. Under Map to Sellfern Store, select the matching store from the dropdown and click Save — Fetch Orders is blocked until this mapping is set.
- Select an Order State (All, Unfulfilled, Unpaid, Open, Archived — the same tabs as Shopify’s own Orders page).
- Click Fetch Orders to load a preview table, then Push to Sellfern to ingest them.
Auto-Sync
Each platform has its own Auto-Sync toggle — Daily at a set time, or Hourly on an interval — so orders push on a schedule without opening the popup.Etsy auto-sync always targets New orders only. Shopify auto-sync uses whichever Order State filter is currently selected on the Shopify tab (defaults to Unfulfilled).
Webhook & API Order Sync
Sellfern supports automated order ingestion via secure API tokens and Webhook endpoints. Once connected, an order posts to Sellfern the moment it’s created — no manual import, and it’s filed under the store you choose.Setup
1
Create a Sellfern API token
In Sellfern, go to Settings → API Tokens and click Create Token. Give it a name (for example,
Order Sync Token) and copy the token — it is shown only once. The token identifies your organization, so synced orders land in your account.2
Configure your integration
Use the API token in your HTTP headers (
Authorization: Bearer <TOKEN>) when posting order payloads to /api/v2/orders.How syncing works
Once connected, each new order is sent to Sellfern as it is created, filed under the store name you set. Key behaviors:- Orders are deduplicated on
store_id+order_id, so an order is never recorded twice. - Every sync is recorded in Sync History with real-time status tracking.
Shopify Order Sync
For Shopify stores, install the Sellfern OrderSync app from the Shopify App Store instead of building a custom webhook integration. It runs inside your Shopify admin under Apps → Order Sync and forwards orders to Sellfern automatically.1
Install the app
Install Sellfern OrderSync on your Shopify store.
2
Create a Sellfern API token
In Sellfern, go to Settings → API Tokens and create a token. Copy it — it’s shown only once.
3
Connect the app
In the Shopify admin, open Order Sync and paste the token into the Connection card, then click Connect. Every new order syncs to Sellfern automatically from that point on, usually within seconds of the sale.
4
(Optional) Map to a specific store
In the Sellfern store card, click Edit, type the store name exactly as it appears in Settings → Stores, then click Check store and Save store. Leave it empty to file orders under the shop’s
.myshopify.com domain instead.Orders placed before you connect the app are not synced automatically. Use Backfill orders in the app to bring in a date range of past orders — pick a date range and view filter, click Preview to see the matching orders, then click Sync to send them. Already-synced orders are skipped automatically, so re-running a backfill is safe. A single click processes up to 100 orders, and date ranges older than 60 days require the app’s
read_all_orders scope.Gmail Live Sync
Gmail Live Sync connects a Google account to Sellfern and periodically scans that inbox for Etsy order confirmation emails. Each matching message is parsed for order data — buyer, items, SKUs, totals — and turned into an order automatically, on the schedule and search window you configure. Messages that don’t parse cleanly land in Failed Ingestions instead of blocking the rest of the batch.Gmail Live Sync is not self-serve. It requires a one-time setup on Sellfern’s side (Google API access for your organization) before any account can be connected. If you want to use this service, contact your Sellfern admin to have it enabled — only after that can an Admin connect a Google account and run syncs.
CSV bulk import
CSV bulk import, called Legacy Bulk in the app, lets you upload historical or spreadsheet-based orders.1
Open Legacy Bulk
Go to Orders → Ingestion → Legacy Bulk.
2
Select your file
Click Select CSV and choose a
.csv file from your computer.3
Review the preview
Check the detected format, order count, first 50 preview rows, and financial fields before committing anything.
4
Finalize or cancel
Click Finalize Import to commit parsed orders, or Cancel to discard the upload without saving anything.
Etsy Invoice Processor
The Etsy Processor converts Etsy invoice PDFs into production sheets and enriches missing data.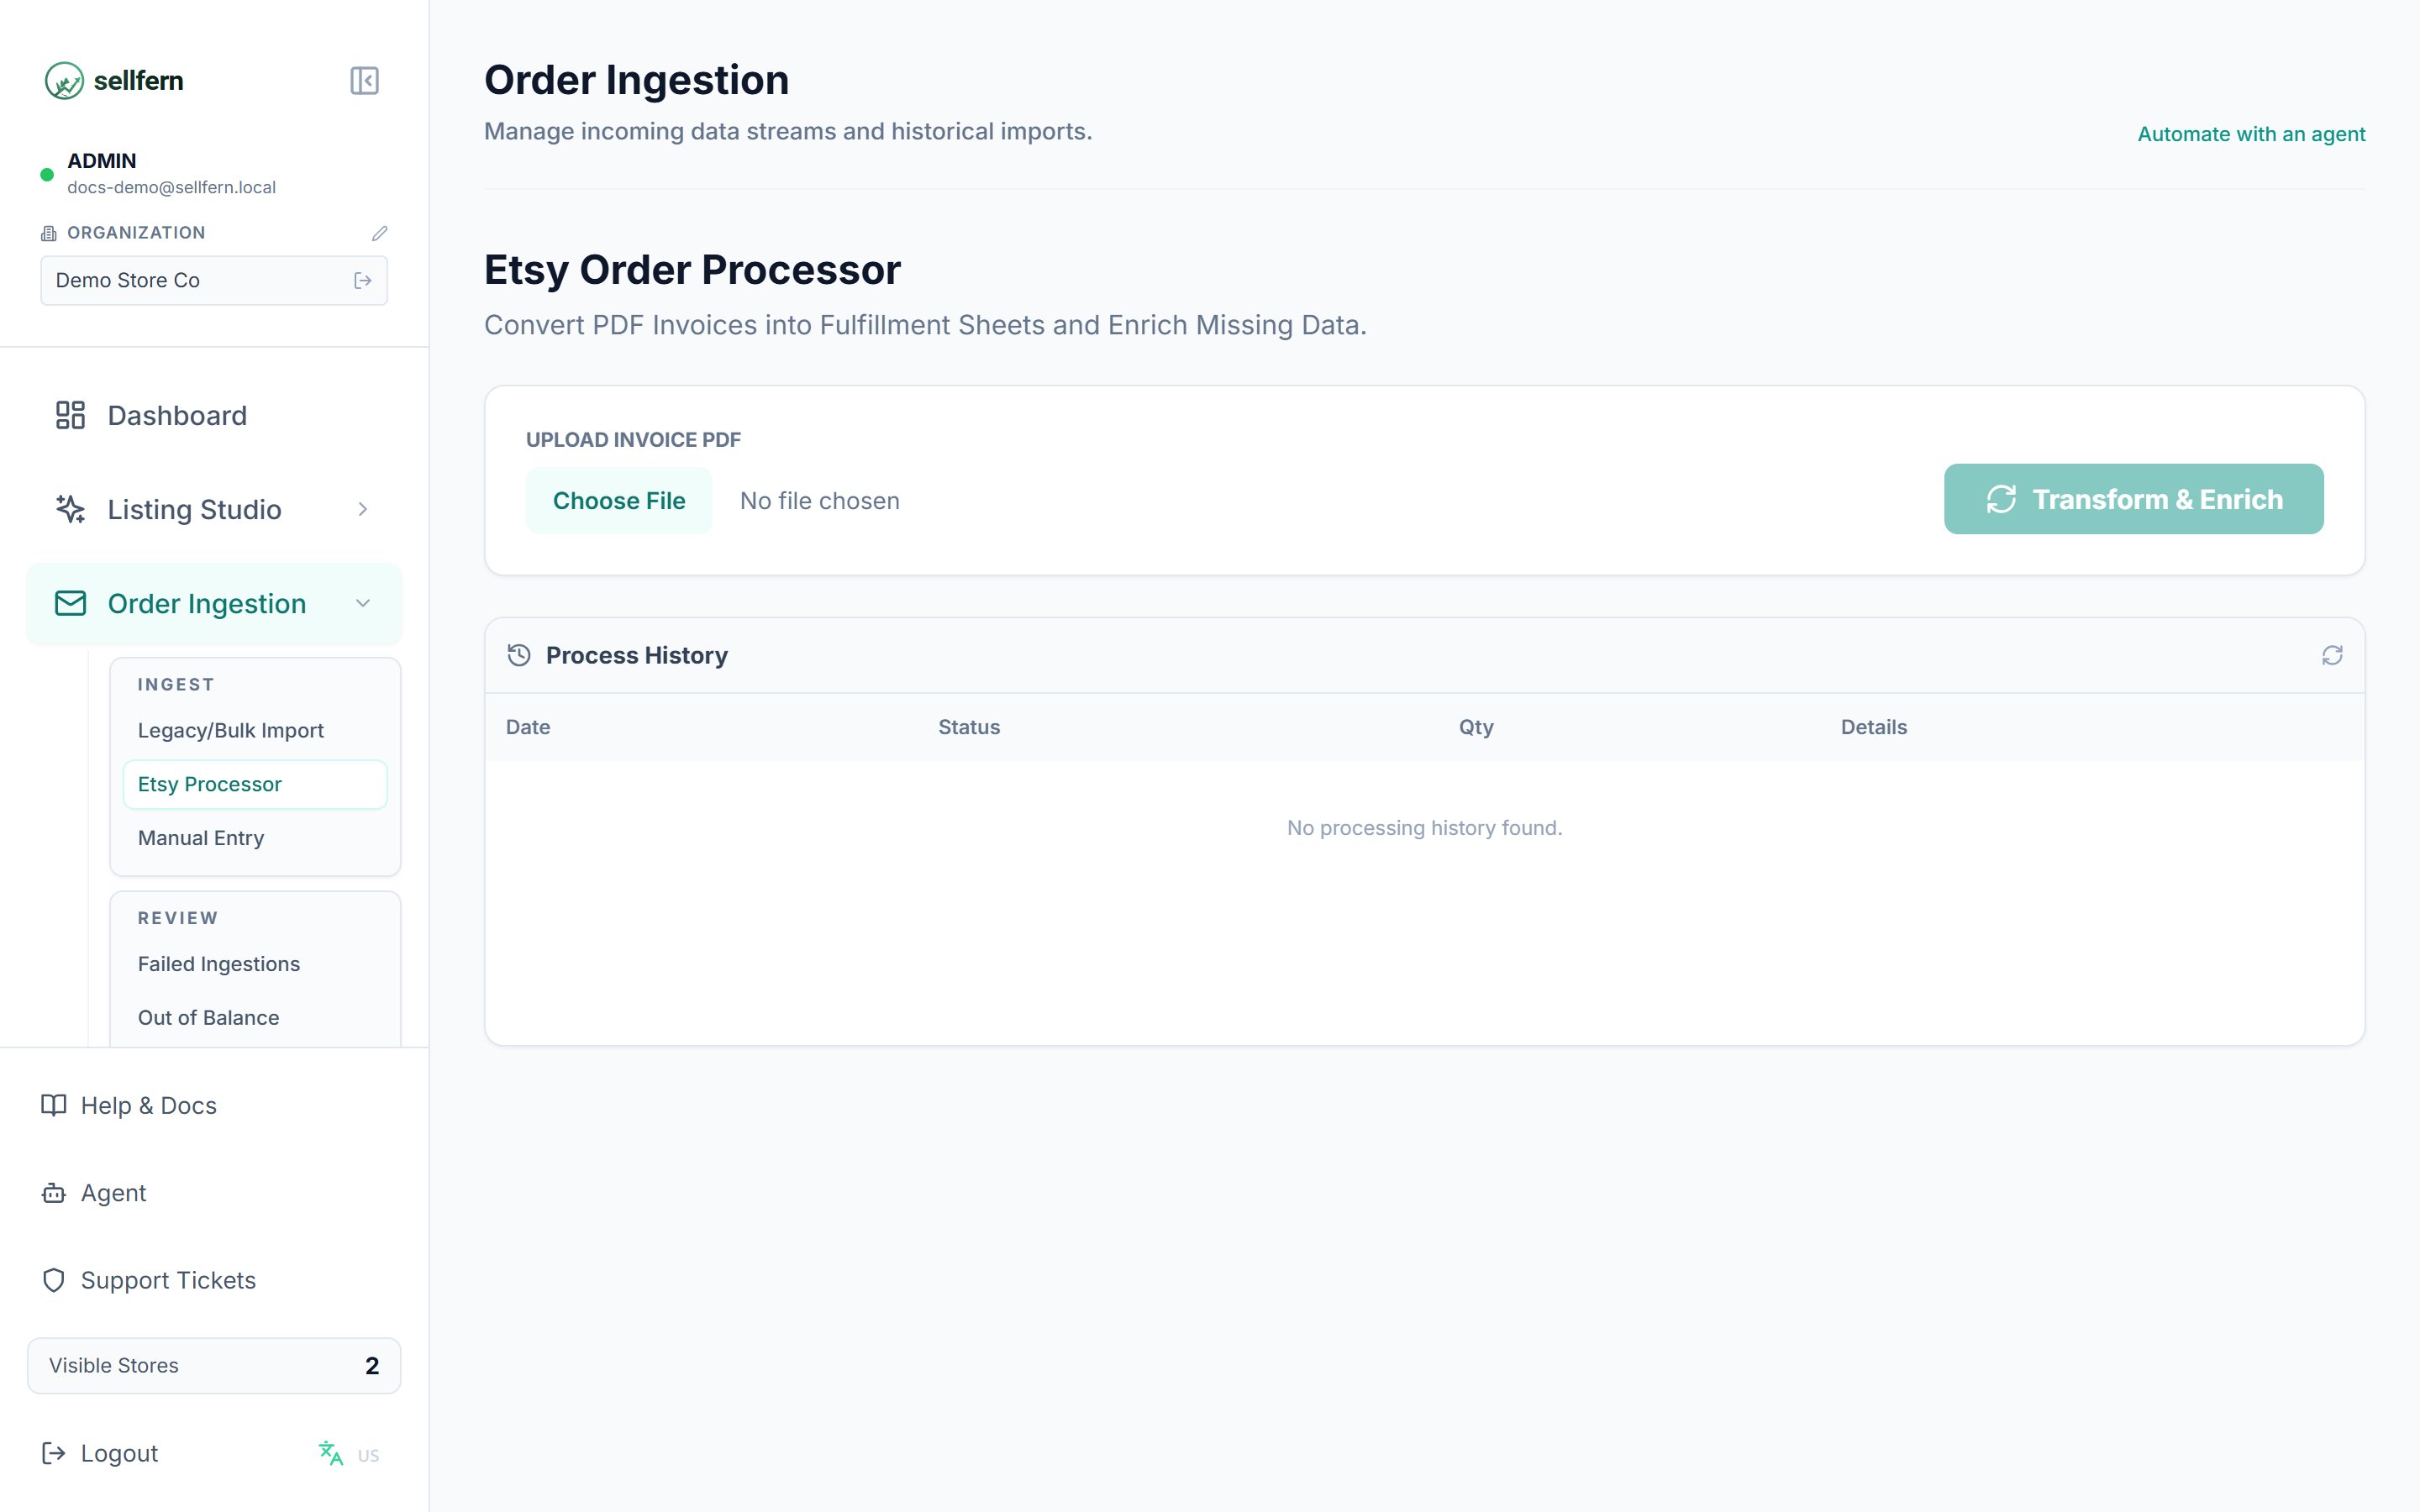
The Etsy Processor — upload the invoice PDF, transform & enrich, with the processing history below
1
Open the Etsy Processor
Go to Order Ingestion → Etsy Processor.
2
Upload the invoice PDF
Select the invoice PDF downloaded from Etsy and click Transform & Enrich.
3
Review the preview
Sellfern parses the PDF and shows a preview table with counters: orders created, items created, addresses fixed, SKUs repaired, and newly discovered products.
4
Save mappings and export
Click Save SKU Mappings so the system remembers repaired SKUs for next time, and Export Excel if you need to send a production sheet to a supplier. The processing history appears below.
Manual entry
Manual Entry lets you create or update a single order directly in Sellfern. Use it for custom orders, phone orders, wholesale work, corrections, and resolving failed ingestions or out-of-balance records.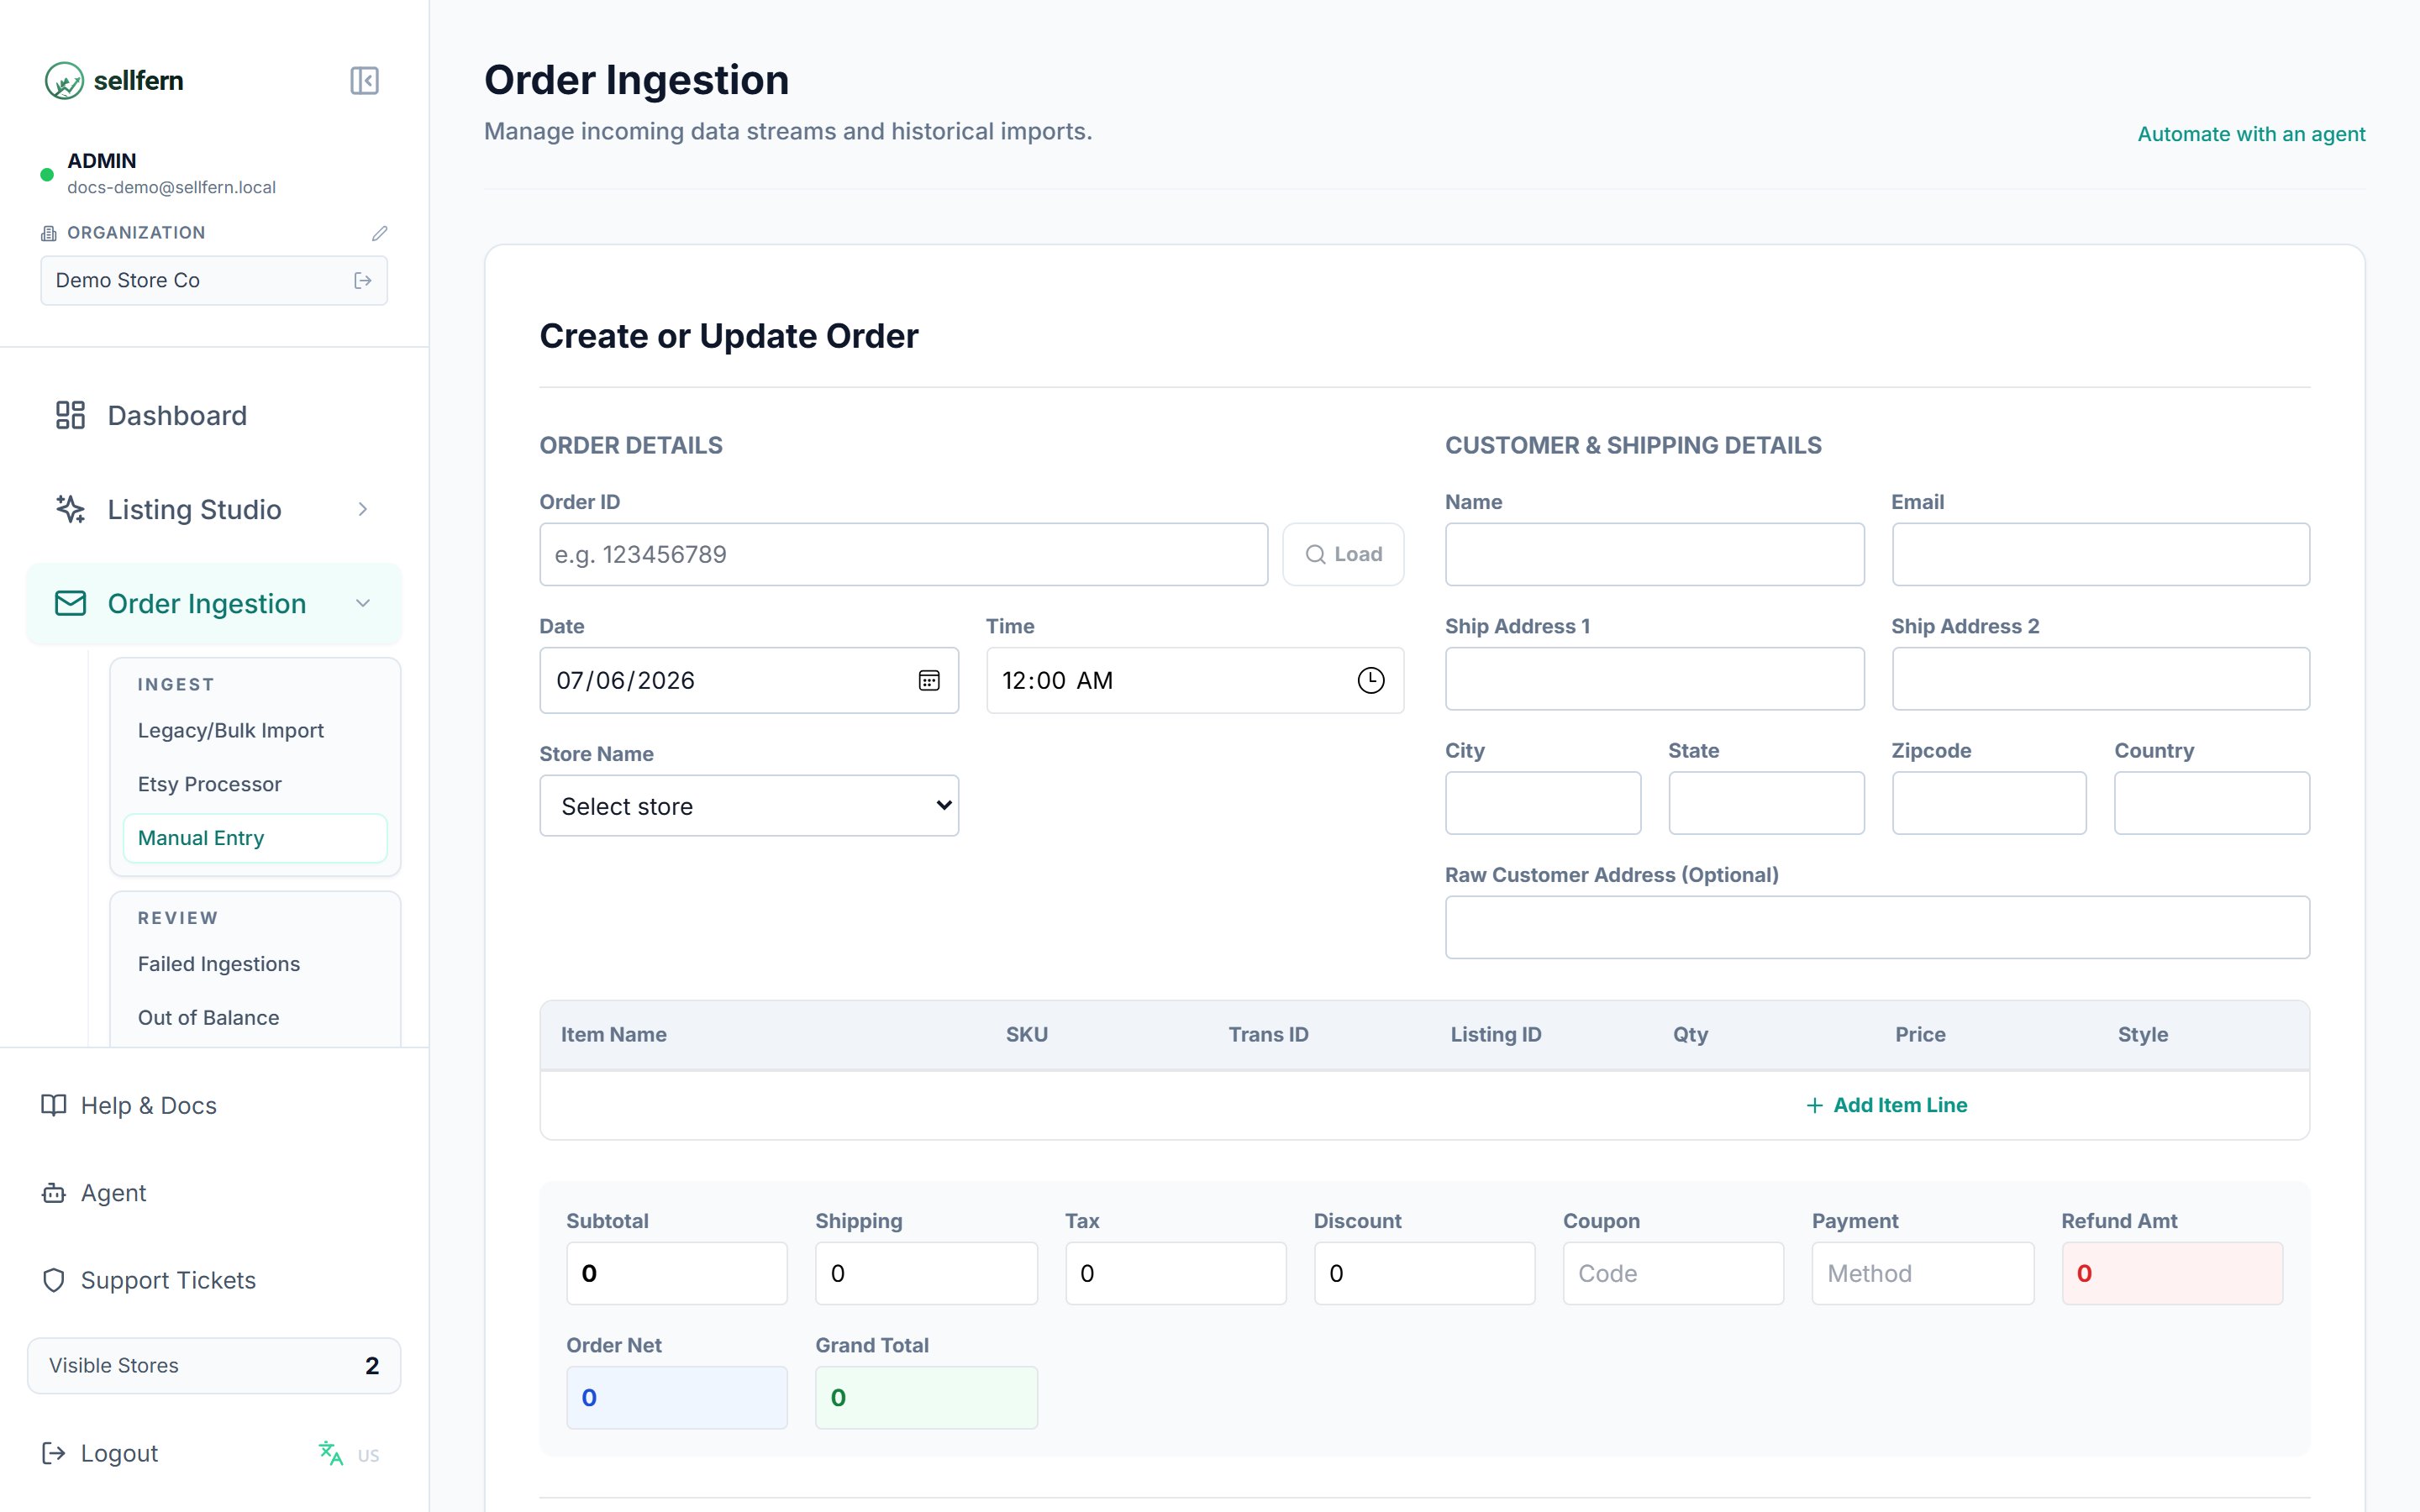
The Manual Entry form — create an order or load one for targeted corrections
- Order ID is required.
- At least one line item is required.
- Refund amount cannot be negative. Enter the deduction amount as a positive value.
- If the store field is blank, Sellfern uses Manual Entry as the store name.
- If the customer name is blank, Sellfern uses Walk-in.
- Currency defaults to USD.
- Subtotal, shipping, tax, and discount changes automatically recalculate the total.
- An item’s status becomes Complete when a base cost is provided; otherwise it stays Pending Cost.
Reviewing imports
After any import method, use the Failed Ingestions and Out of Balance review tabs to catch and fix problems.Failed ingestions
The Failed Ingestions tab lists source records that could not be parsed into orders. From here you can review the raw record and error context, open a failed record in Manual Entry, or delete failures that are no longer needed. When you resolve a failed ingestion through Manual Entry and save successfully, Sellfern deletes the failed-ingestion record automatically.Out of balance
The Out of Balance tab lists orders whose recorded totals do not match the detailed order math. Use the store filter, date range, and pagination controls to narrow the list, then open an order in Manual Entry to correct totals or line items.Store Mismatch
The Store Mismatch tab (Admin only) lists orders whose store name does not match any store configured in Settings → Stores — usually a typo in the source data or a store that hasn’t been created yet. Reassign the order to the correct store so per-store reporting stays accurate.Sync History
The Sync History tab records every sync/import run, its timestamp, status, and record counts — use it to verify whether a batch was imported and whether it produced errors.Automation and API guidance
For supported public automation patterns, use the V1 developer documentation rather than internal app routes. Start with the developer quickstart or the API Reference.Troubleshooting
Start Sync is disabled
Start Sync is disabled
Connect a Gmail account first, or wait for the current sync to finish before starting a new one.
Gmail token expired
Gmail token expired
Reconnect the affected Google account from the Live Sync connection list.
CSV preview looks incorrect
CSV preview looks incorrect
Cancel the upload without finalizing, correct the CSV file, and upload it again.
Manual save fails
Manual save fails
Confirm the order has an Order ID, at least one line item, and any refund amount is entered as a positive number.
API orders are not appearing in Sellfern
API orders are not appearing in Sellfern
Confirm your API token is active under Settings → API Tokens, and check Sync History for error logs.